
4、PXE/Cobbler
PXE(Pre-boot Execution Environment,预启动执行环境)是由 Intel 公司开发的技术,工作于 Client/Server 网络模式,支持客户端通过网络从远程服务器下载映像,通过网络启动操作系统。
严格来说,PXE 并不是一种安装方式,而是一种引导方式。进行 PXE 安装的必要条件是在要安装的计算机中必须包含一个 PXE 支持的网卡(NIC),即网卡中必须要有 PXE Client。
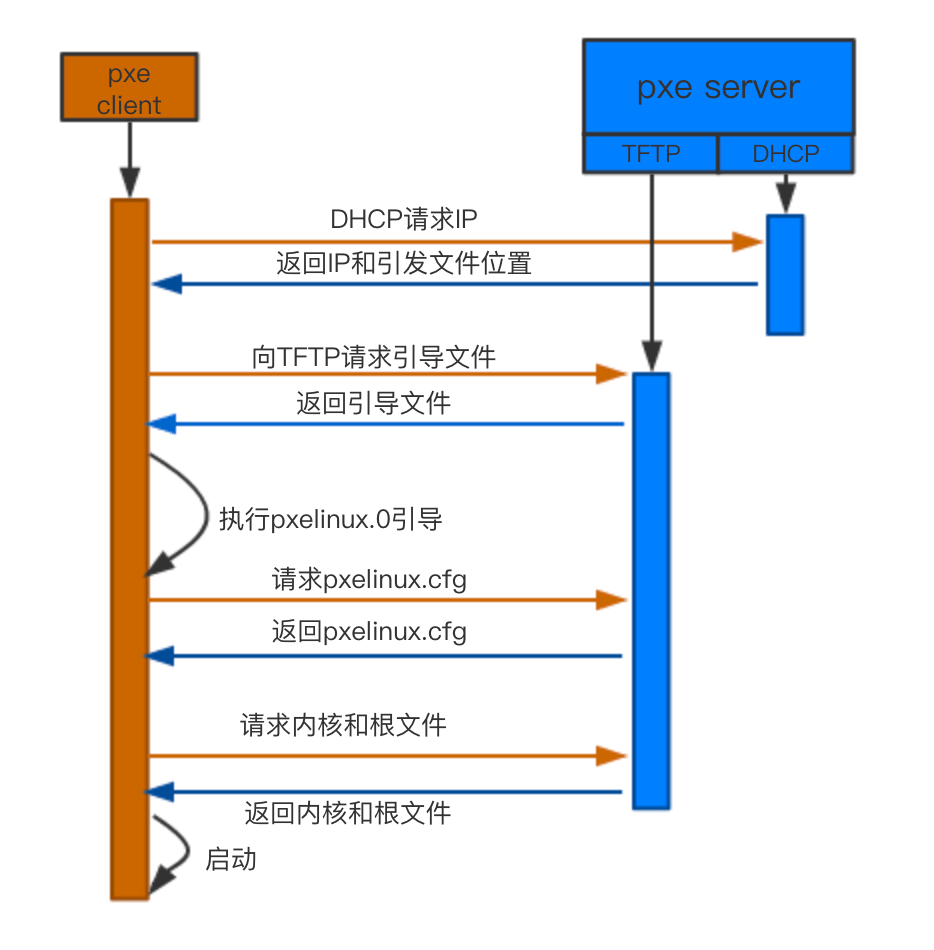
PXE 协议可以使计算机通过网络启动。此协议分为 Client 端和 Server 端,而 PXE Client 则在网卡的 ROM 中。当计算机引导时,BIOS 把 PXE Client 调入内存中执行,然后由 PXE Client 将放置在远端的文件通过网络下载到本地运行。
运行 PXE 协议需要设置 DHCP 服务器和 TFTP 服务器。DHCP 服务器会给 PXE Client(将要安装系统的主机)分配一个 IP 地址,由于是给 PXE Client 分配 IP 地址,所以在配置 DHCP 服务器时需要增加相应的 PXE 设置。
此外,在 PXE Client 的 ROM 中,已经存在了 TFTP Client,那么它就可以通过 TFTP 协议到 TFTP Server 上下载所需的文件了。
Legacy Bios PXE 工作流程大致如下:
UEFI Bios PXE 工作流程大致如下:

4.1、CentOS PXE
CentOS 安装的完整过程
1、启动阶段
- 引导加载器(Bootloader)启动
如果从光盘或USB启动,BIOS/UEFI会加载ISO镜像中的引导加载器(如isolinux或grub)。
如果通过PXE网络启动,PXE客户端会从TFTP服务器下载引导加载器(如pxelinux.0)。 - 加载内核和initrd
引导加载器会加载内核(vmlinuz)和初始 RAM 磁盘(initrd.img)。
initrd.img 是一个临时的根文件系统,包含启动安装环境所需的基本工具和驱动程序。
2、安装环境初始化
- 内核启动
内核加载后,会挂载 initrd.img 作为临时根文件系统。
内核初始化硬件设备,并加载必要的驱动程序。 - 运行安装程序(Anaconda)
initrd.img 中的脚本会启动CentOS的安装程序——Anaconda。
Anaconda 是CentOS的图形化/文本化安装程序,负责系统的安装和配置。 - 加载安装环境
Anaconda 会从 install.img 中加载完整的安装环境。
install.img 包含安装程序所需的工具、库和文件系统支持。
3、安装配置
- 选择安装源
Anaconda 会提示用户选择安装源(如光盘、网络镜像或本地 ISO 文件)。
如果通过网络安装(如 PXE),Anaconda 会从指定的 HTTP/FTP/NFS 服务器下载安装文件。 - 配置安装选项,用户需要配置以下内容
语言、时区、键盘布局。
磁盘分区(手动或自动)。
网络配置(IP地址、主机名等)。
软件包选择(最小安装、桌面环境、服务器环境等)。
设置root密码和创建普通用户。
4、系统安装
- 格式化磁盘
Anaconda 会根据用户的分区方案格式化磁盘,并创建文件系统(如ext4、xfs等)。 - 安装软件包
Anaconda 会从安装源下载选定的软件包,并将其安装到目标磁盘。
安装过程中会显示进度条,用户可以看到安装的进度。 - 安装引导加载器(GRUB)
安装完成后,Anaconda 会将 GRUB 引导加载器安装到磁盘的 MBR 或 EFI 分区。
GRUB 负责在系统启动时加载内核。
5、安装后配置
- 生成initramfs
Anaconda 会为安装的系统生成一个新的 initramfs,包含必要的驱动程序和工具。
initramfs 用于系统启动时加载根文件系统。 - 完成安装
安装完成后,Anaconda 会提示用户重启系统。
重启后,系统会从硬盘启动,进入新安装的 CentOS 系统。
6、首次启动
- 首次启动配置
首次启动时,系统可能会运行一些初始化脚本,完成最后的配置(如SELinux配置、网络配置等)。
用户可能需要接受许可协议或进行一些简单的设置。 - 进入系统
配置完成后,用户可以使用设置的root密码或普通用户登录系统。
系统安装完成,可以正常使用。
4.1.1、DHCP 配置
安装 dhcpd 服务:
yum install dhcp -y编辑 dhcp 配置文件:
vi /etc/dhcp/dhcpd.conf#
# DHCP Server Configuration file.
# see /usr/share/doc/dhcp-server/dhcpd.conf.example
# see dhcpd.conf(5) man page
#
# 说明:option pxe-system-type,此选项可以指定x86或者ARM使用不同的引导文件,07和09为x86 UEFI;0b为ARM UEFI。
default-lease-time 600;
max-lease-time 7200;
ddns-update-style none;
option pxe-system-type code 93 = unsigned integer 16;
subnet 192.168.88.0 netmask 255.255.255.0 {
range 192.168.88.111 192.168.88.199;
option routers 192.168.88.118;
option broadcast-address 192.168.88.255;
option subnet-mask 255.255.255.0;
option ntp-servers 192.168.88.118;
option time-servers 192.168.88.118;
option domain-name-servers 192.168.88.118;
if option pxe-system-type = 00:07 {
filename "x86_uefi/BOOTX64.EFI";
} else if option pxe-system-type = 00:09 {
filename "x86_uefi/BOOTX64.EFI";
} else if option pxe-system-type = 00:0b {
filename "arm_uefi/BOOTAA64.EFI";
} else {
filename "pxelinux.0";
}
# filename "x86_uefi/BOOTX64.EFI";
# filename "arm_uefi/BOOTAA64.EFI";
next-server 192.168.88.118;
}
#绑定MAC地址和IP
host pc1{
hardware ethernet 2C:97:B1:C7:F3:6A;
fixed-address 192.168.88.113;
}
host pc2{
hardware ethernet b8:59:9f:bd:f7:92;
fixed-address 192.168.88.134;
}重启 dhcp 服务:
systemctl restart dhcpd
systemctl status dhcpd
4.1.2、TFTP 配置
安装 TFTP 软件:
yum install tftp xinetd tftp-server –y修改 TFTP 配置文件,默认情况下 TFTP 服务是禁用的,所以要修改 tftp 配置文件来开启服务将 disable 的值更改为 no 即可,其中 tftp 的默认根目录为 /var/lib/tftpboot,如下:
vi /etc/xinetd.d/tftp# default: off
# description: The tftp server serves files using the trivial file transfer \
# protocol. The tftp protocol is often used to boot diskless \
# workstations, download configuration files to network-aware printers, \
# and to start the installation process for some operating systems.
service tftp
{
socket_type = dgram
protocol = udp
wait = yes
user = root
server = /usr/sbin/in.tftpd
server_args = -s /var/lib/tftpboot
disable = no
per_source = 11
cps = 100 2
flags = IPv4
}关闭防火墙,否则 TFTP 获取文件时会显示超时:
systemctl stop firewalld
systemctl disable firewalld
重启 TFTP 服务:
systemctl restart xinetd
systemctl status xinetd
使用 xinetd 作为 TFTP 服务的守护进程时,不需要单独启动 TFTP 服务。xinetd 是一个超级守护进程,它负责管理其他服务(如 TFTP)的启动和停止。TFTP 服务是通过 xinetd 按需启动的,而不是作为一个独立的服务运行。
xinetd 监听配置文件(如 /etc/xinetd.d/tftp)中定义的服务端口。当有客户端请求 TFTP 服务时,xinetd 会根据配置文件启动 TFTP 服务进程。请求结束后,TFTP 服务进程会被终止,直到下一次请求到来。
说明:如果不喜欢 xinetd 管理 tftp,单独安装 tftp-server,直接启动 tftp 服务也是可以的,而且更简单。
4.1.3、HTTP 配置
安装 HTTP 软件:
yum install httpd –y
systemctl restart httpd
systemctl status httpd
将 x86 和 ARM 版本的 OS 镜像上传到本地 root 目录下:
cd /var/www/html/
mkdir centos76_x86
mkdir centos76_arm
将 root 目录下的 ISO 镜像挂载到 /mnt 目录下:
mkdir /mnt/x86
mkdir /mnt/arm
mount  /root/CentOS-7-x86_64-DVD-1810-76.iso  /mnt/x86
mount  /root/CentOS-7-aarch64-Everything-1810.iso  /mnt/arm
然后把挂载目录中的文件全部复制到对应 http 文件夹中:
cp -r /mnt/x86/* /var/www/html/centos76_x86/
cp -r /mnt/arm/* /var/www/html/centos76_arm/
注意:如果测试 http 服务时出现欢迎界面,而不是文件索引,可以如下修改。
Options Indexes FollowSymLinks
AllowOverride None
Require all granted
如果 ks 文件放在 http 根目录下,需要开放根目录下载权限。
AllowOverride none
Require all granted
另外,ks 文件本身也要有可读权限。
4.1.4、配置引导文件
4.1.4.1、获取引导文件
在 TFTP 目录下创建 UEFI x86、UEFI ARM 的引导文件夹,Legacy Bios 默认在 tftp 根目录:
cd /var/lib/tftpboot/
mkdir x86_uefi
mkdir arm_uefi
将 x86 和 ARM 的引导文件复制到对应目录:
cd /var/www/html/

# 复制UEFI x86所需文件
cp -r centos76_x86/EFI/BOOT/* /var/lib/tftpboot/x86_uefi/
cp centos76_x86/images/pxeboot/vmlinuz /var/lib/tftpboot/x86_uefi/
cp centos76_x86/images/pxeboot/initrd.img /var/lib/tftpboot/x86_uefi/

# 复制UEFI arm所需文件:
cp -r centos76_arm/EFI/BOOT/* /var/lib/tftpboot/arm_uefi/
cp centos76_arm/images/pxeboot/vmlinuz /var/lib/tftpboot/arm_uefi/
cp centos76_arm/images/pxeboot/initrd.img /var/lib/tftpboot/arm_uefi/

# 复制Legacy Bios所需文件
cp /usr/share/syslinux/{pxelinux.0,ldlinux.c32} /var/lib/tftpboot/
cp centos76_x86/images/pxeboot/vmlinuz /var/lib/tftpboot/
cp centos76_x86/images/pxeboot/initrd.img /var/lib/tftpboot/
注意:pxelinux.0 引导文件在 syslinux 软件包中,找到合适的源安装 syslinux 软件包。
yum install syslinux -y或者下载到本地解压:
rpm2cpio syslinux-4.05-15.el7.x86_64.rpm | cpio -dimv
ls -l usr/share/syslinux/{pxelinux.0,ldlinux.c32}
cp usr/share/syslinux/{pxelinux.0,ldlinux.c32} /var/lib/tftpboot/
4.1.4.2、配置 grub 文件
UEFI BIOS:修改 x86 引导的 grub.cfg 文件。
cd /var/lib/tftpboot/x86_uefi/
vi grub.cfg
set default="0"
function load_video {
insmod efi_gop
insmod efi_uga
insmod video_bochs
insmod video_cirrus
insmod all_video
}
load_video
set gfxpayload=keep
insmod gzio
insmod part_gpt
insmod ext2
set timeout=5
### END /etc/grub.d/00_header ###
### BEGIN /etc/grub.d/10_linux ###
menuentry 'Install CentOS 7' --class fedora --class gnu-linux --class gnu --class os {
linuxefi x86_uefi/vmlinuz inst.ks=http://192.168.88.118/ks_x86.cfg quiet
initrdefi x86_uefi/initrd.img
}set default="0" 指定默认选择的启动选项。
set timeout=5 指定在引导界面的超时时间。
inst.ks 可以指定 kickstart 文件的位置,kickstart 文件可以用来全自动安装。
UEFI BIOS:修改 ARM 的 grub.cfg 文件。
cd /var/lib/tftpboot/arm_uefi/
vi grub.cfg
set default="0"
function load_video {
if [ x$feature_all_video_module = xy ]; then
insmod all_video
else
insmod efi_gop
insmod efi_uga
insmod ieee1275_fb
insmod vbe
insmod vga
insmod video_bochs
insmod video_cirrus
fi
}
load_video
set gfxpayload=keep
insmod gzio
insmod part_gpt
insmod ext2
set timeout=5
### END /etc/grub.d/00_header ###
search --no-floppy --set=root -l 'CentOS 7 aarch64'
### BEGIN /etc/grub.d/10_linux ###
menuentry 'Install CentOS 7' --class red --class gnu-linux --class gnu --class os {
linux arm_uefi/vmlinuz inst.ks=http://192.168.88.118/ks_arm.cfg ro
initrd arm_uefi/initrd.img
}Legacy Bios:在 tftp 根目录中创建目录 pxelinux.cfg,添加名为 default 的配置文件。
mkdir /var/lib/tftpboot/pxelinux.cfg
vim /var/lib/tftpboot/pxelinux.cfg/default
# 可根据/media/isolinux/isolinux.cfg修改
# 设置背景图片,如 menu background splash.png,要将splash.png文件放在tftp根目录下
# 设置菜单风格,如 default vesamenu.c32,要将vesamenu.c32文件放在tftp根目录下
# 这里直接指定从哪个label启动,省去了进入菜单的时间
# prompt 显示引导提示符,手动选择label引导,1 显示 boot: 提示符,0 不显示提示符
default linux
prompt 0
timeout 600
label linux
menu label ^Install system
kernel vmlinuz
append initrd=initrd.img ip=dhcp inst.repo=http://192.168.88.118/centos76_x86 inst.ks=http://192.168.88.118/ks_legacy.cfg注意:这里的 inst.repo 和 kickstart 中的 url 不要混淆了。Anaconda 通过 inst.repo 找 images/install.img 加载安装环境,通过 kickstart 中的 url 找 rpm 包安装源
4.1.5、Kickstart 文件配置
Kickstart 文件需要放到 /var/www/html/ 文件夹下,确保可以通过 http 协议获取到。
cd /var/www/html/
touch ks_x86.cfg
touch ks_arm.cfg
touch ks_legacy.cfg
vim ks_x86.cfgauth --enableshadow --passalgo=sha512
install
url --url=http://192.168.88.118/centos76_x86 //此处为安装镜像源地址
text
firstboot --disable
firewall --disabled
selinux --disabled
reboot
keyboard --vckeymap=us --xlayouts='us'
lang en_US.UTF-8
network --bootproto=dhcp --hostname=Centos7 --device=ens3f0 --activate
rootpw --plaintext 12345678
services --disabled="chronyd"
timezone Asia/Shanghai
bootloader crashkernel=auto --location=mbr --boot-drive=sda
clearpart --all --initlabel
#因为是UEFI引导,必须指定efi分区且分区的类型必须是efi,挂载到/boot/efi,size默认单位Mb
part /boot/efi --fstype="efi" --ondisk=sda --size=1024
part swap --fstype="swap" --size=2048
part /boot --fstype="ext4" --size=1024
part / --fstype="xfs" --size=1 --grow
# 自动分区
# autopart --type=lvm
# clearpart --all --initlabel
%pre
parted -s /dev/sda mklabel gpt
%end
%packages
@^minimal
@core
kexec-tools
%endvim ks_arm.cfgauth --enableshadow --passalgo=sha512
install
url --url=http://192.168.88.118/centos76_arm //此处为ARM安装源地址
text
firstboot --disable
firewall --disabled
selinux --disabled
reboot
keyboard --vckeymap=us --xlayouts='us'
lang en_US.UTF-8
network --bootproto=dhcp --hostname=Centos7 --device=ens3f0 --activate
rootpw --plaintext 12345678
services --disabled="chronyd"
timezone Asia/Shanghai
bootloader crashkernel=auto --location=mbr --boot-drive=sda
clearpart --all --initlabel
#因为是UEFI引导,必须指定efi分区且分区的类型必须是efi,挂载到/boot/efi
part /boot/efi --fstype="efi" --ondisk=sda --size=1024
part swap --fstype="swap" --size=2048
part /boot --fstype="ext4" --size=1024
part / --fstype="xfs" --size=1 --grow
# 自动分区
# autopart --type=lvm
# clearpart --all --initlabel
%pre
parted -s /dev/sda mklabel gpt
%end
%packages
@^minimal
@core
kexec-tools
%endvim ks_legacy.cfginstall
url --url=http://192.168.88.118/centos76_x86
text
lang en_US.UTF-8
keyboard us
zerombr
bootloader --location=mbr --driveorder=sda --append="crashkernel=auto rhgb quiet" --location=mbr --driveorder=sda
network --bootproto=dhcp --device=enp0s3 --onboot=yes --noipv6 --hostname=CentOS7
timezone --utc Asia/Shanghai
authconfig --enableshadow --passalgo=sha512
rootpw --iscrypted $6$Ivywr2J3hw9DVOyM$YSNpObpKiJ7iRvOL9wpJf/mEY29cAuMG3drIvcXc56pQkyQIR68RuwfonNVSkt2CZMcgLwITASS/tlX98SfTZ0
clearpart --all --initlabel
part /boot --fstype xfs --size 1024
part swap --size 1024
part / --fstype xfs --size 1 --grow
services --enabled="chronyd"
firstboot --disable
selinux --disabled
firewall --disabled
logging --level=info
reboot
%packages
@^minimal
@core
chrony
kexec-tools
%endkickstart 文件参数很多,如果找不到合适的 ks 文件,可以通过 system-config-kickstart 生成应答文件,
system-config-kickstart是一款图形化工具,需要桌面环境或 X11 服务。yum install -y system-config-kickstart system-config-kickstart安装 X11 支持,包括中文字体支持。
yum install -y xorg-x11-xauth
yum install -y google-noto-sans-fonts wqy-unibit-fonts wqy-zenhei-fonts
CentOS 8 以上 ks.cfg 配置有点区别,有的指令废弃了,有的指令换了,如下:
url --url=http://192.168.59.128/r810/BaseOS/
text
lang en_US.UTF-8
keyboard us
zerombr
bootloader --location=mbr --driveorder=sda --append="crashkernel=auto rhgb quiet" --location=mbr --driveorder=sda
network  --bootproto=dhcp --device=enp0s3 --onboot=yes --noipv6 --hostname=r810
timezone --utc Asia/Shanghai
authselect --enableshadow --passalgo=sha512
rootpw  --iscrypted $6$ZobpnRxv$Qmr5ymYDhFPuuUSBa.GYlj9F.SdA64Il2xAXd0KH7FpFpa4f6cmO5M0npbxHNRSgbEof97cj8IXQrAoPbBT4N/
clearpart --all --initlabel
part /boot --fstype xfs --size 1024
part swap --size 1024
part / --fstype xfs --size 1 --grow
services --enabled="chronyd"
firstboot --disable
selinux --disabled
firewall --disabled
logging --level=info
reboot

%packages
@^server-product-environment
kexec-tools

%end
4.1.6、重启服务
systemctl restart dhcpd
systemctl restart xinetd
systemctl restart httpd
安装过程中的日志可以通过 message 日志查看。
4.2、Ubuntu PXE
Ubuntu PXE 系统安装流程
1、启动阶段
- 客户端 BIOS/UEFI 网络启动(PXE)后,发送 DHCP 请求。
- DHCP 服务器分配 IP 地址,并告知 TFTP 服务器地址和引导文件路径(如 pxelinux.0)。
- 客户端从 TFTP 服务器下载引导加载器 pxelinux.0。
2、加载内核和 initrd
- 引导加载器读取 PXE 配置文件(如
/pxelinux.cfg/default)。 - 根据配置加载内核(vmlinuz)和 initrd(initrd.gz)。
LABEL ubuntu KERNEL ubuntu/linux INITRD ubuntu/initrd.gz APPEND root=/dev/ram0 ip=dhcp autoinstall url=... - 内核和 initrd 被加载到客户端内存中。
3、内核初始化
- 内核解压并启动,解析 APPEND 中的参数(如 root=/dev/ram0)。
- 挂载 initrd 作为临时根文件系统(tmpfs 或 ramdisk)。
- 初始化硬件设备(如网络驱动、磁盘控制器驱动)。
4、initrd 的职责
initrd 中的初始化脚本(/init)开始运行:
- 配置网络:根据 ip=dhcp 获取 IP 地址。
- 加载必要驱动:如存储驱动(SCSI、NVMe)、文件系统驱动(ext4、xfs)。
- 挂载安装源:根据 url= 参数(如 HTTP/NFS 路径)挂载远程 Ubuntu 仓库或 ISO 镜像。
- 启动安装程序:
- 对于 Ubuntu Server 22.04+,启动 Subiquity(基于文本的安装程序)。
- 检测到 autoinstall 参数时,进入自动化模式。
5、安装程序(Subiquity)的启动
- Subiquity 从 /proc/cmdline 读取参数(如 autoinstall、url=)。
- 自动化配置:
- 如果存在 autoinstall,Subiquity 从指定位置(如 cloud-init 的 user-data)加载 YAML 配置。
- 若未配置自动化,进入交互式文本安装界面(旧版本使用 debconf)。
- 初始化安装环境:
- 验证安装源(url= 指向的仓库或 ISO)。
- 加载软件包列表和依赖关系。
6、系统安装阶段
- 磁盘分区:
- 根据 user-data 中的配置自动分区(如 LVM、ZFS)。
- 若未配置,提示手动分区。
- 软件包安装:
- 从安装源下载核心软件包(base-files、linux-image 等)。
- 安装到目标磁盘的
/分区。
- 配置系统:
- 创建用户账户(根据 user-data 中的 username 和 password)。
- 设置主机名、时区、语言。
- 安装引导加载器(GRUB):
- 将 GRUB 写入磁盘的 MBR 或 EFI 分区。
- 支持 UEFI Secure Boot(若启用)。
7、安装后配置
cloud-init 或首次启动脚本
- 生成 initramfs:根据安装的硬件生成新的 initramfs,包含必要的驱动。
- 应用 cloud-init 配置:
- 从 ds=nocloud-net;s=... 指定的 URL 下载 user-data。
- 配置网络、SSH 密钥、软件源等。
- 清理临时文件:卸载 initrd,释放内存。
8、完成安装
- 提示安装完成,要求重启。
- 客户端重启,从硬盘启动。
- 首次进入系统:
- 运行 cloud-init 完成最终配置(如扩展分区、安装额外软件)。
- 用户通过 SSH 或控制台登录。
参数传递过程:
KERNEL ubuntu/linux
APPEND root=/dev/ram0 ramdisk_size=1500000 ip=dhcp url=... autoinstall ds=...
与下面等价:
KERNEL ubuntu/linux root=/dev/ram0 ramdisk_size=1500000 ip=dhcp url=... autoinstall ds=...内核参数:如 root=、ip=dhcp、ramdisk_size=,由内核直接解析。
用户空间参数:如 autoinstall、url=...、ds=nocloud-net,内核会忽略它们,但这些参数会保留在 /proc/cmdline 中,供用户空间的安装程序(如 subiquity)或工具(如 cloud-init)读取。
4.2.1、配置 DHCP 服务
1、apt 安装 dhcp 服务
sudo apt update
sudo apt install isc-dhcp-server -y
2、查看网卡名称 ens32
sudo ip addr show3、指定 DHCP 网卡
sudo vim /etc/default/isc-dhcp-server
INTERFACESv4="ens32"
4、配置 DHCP 服务
sudo vim /etc/dhcp/dhcpd.conf
# pxe definition
subnet 192.168.42.0 netmask 255.255.255.0 {
    range 192.168.42.33 192.168.42.73;
    option subnet-mask 255.255.255.0;
    option routers 192.168.42.1;
    option broadcast-address 192.168.42.255;
    filename "pxelinux.0";
    next-server 192.168.42.131;
}
5、重启 DHCP 服务、查看 DHCP 服务器状态
sudo systemctl restart isc-dhcp-server
sudo systemctl status isc-dhcp-server
4.2.2、配置 TFTP 服务
1、安装 tftpd-hpa
sudo apt install tftpd-hpa -y2、重启 TFTP 服务
sudo systemctl restart tftpd-hpa.service
sudo systemctl status tftpd-hpa.service
4.2.3、配置 NFS 服务
1、安装 NFS 服务
sudo apt install nfs-kernel-server -y2、编辑 NFS 服务器配置文件,我们 ubuntu 安装镜像会放在 tftp 目录下,nfs 默认路径如下
sudo vim /etc/exports
/var/lib/tftpboot/ubuntu-18.04 192.168.42.0/24(rw,sync,no_subtree_check)
3、更新 NFS 服务器配置、重启、查看状态
sudo systemctl restart nfs-kernel-server
sudo systemctl status nfs-kernel-server
4.2.4、配置 Apache2 服务
1、安装 Apache2 服务
sudo apt install apache2 -y2、重启 Apache2 服务
sudo systemctl restart apache2.service
sudo systemctl status apache2.service
4.2.5、准备 PXE 启动文件
1、下载并解压缩 PXE 引导程序及内核映像文件 Netboot
https://wiki.ubuntuusers.de/Downloads/Netzwerkinstallation/
http://cdimage.ubuntu.com/netboot/bionic/
sudo wget http://archive.ubuntu.com/ubuntu/dists/bionic-updates/main/installer-amd64/current/images/netboot/netboot.tar.gz2、解压缩下载 netboot 文件
sudo tar xf netboot.tar.gz -C /var/lib/tftpboot/3、进入 tftp 默认根目录 /var/lib/tftpboot 查看 netboot 解压后的目录结构,确保 tftp 根目录有 ldlinux.c32、libcom32.c32、libutil.c32、vesamenu.c32 这 4 个文件,这些文件都在 /var/lib/tftpboot/ubuntu-installer/amd64/boot-screens 目录中,可以软连接到根目录。
sudo ln -sv ubuntu-installer/amd64/boot-screens/vesamenu.c32 vesamenu.c32
sudo ln -sv ubuntu-installer/amd64/boot-screens/libcom32.c32 libcom32.c32
sudo ln -sv ubuntu-installer/amd64/boot-screens/libutil.c32 libutil.c32
4、确保 pxelinux.0 和 pxelinux.cfg/default 文件在 tftp 根目录 /var/lib/tftpboot 中,当然我这里解压 netboot 后自动创建了这两个文件的软连接。
ls -l /var/lib/tftpboot/
total 20
drwxrwxr-x  4 root root 4096 2月  22 13:42 ./
drwxr-xr-x 68 root root 4096 2月  22 13:17 ../
lrwxrwxrwx  1 root root   47 9月  15  2021 ldlinux.c32 -> ubuntu-installer/amd64/boot-screens/ldlinux.c32
lrwxrwxrwx  1 root root   48 2月  22 13:29 libcom32.c32 -> ubuntu-installer/amd64/boot-screens/libcom32.c32
lrwxrwxrwx  1 root root   47 2月  22 13:29 libutil.c32 -> ubuntu-installer/amd64/boot-screens/libutil.c32
lrwxrwxrwx  1 root root   33 9月  15  2021 pxelinux.0 -> ubuntu-installer/amd64/pxelinux.0
lrwxrwxrwx  1 root root   35 9月  15  2021 pxelinux.cfg -> ubuntu-installer/amd64/pxelinux.cfg/
drwxr-xr-x 11 root root 4096 2月  22 13:43 ubuntu-18.04/
drwxrwxr-x  3 root root 4096 9月  15  2021 ubuntu-installer/
-rw-rw-r--  1 root root   61 9月  15  2021 version.info
lrwxrwxrwx  1 root root   48 2月  22 13:28 vesamenu.c32 -> ubuntu-installer/amd64/boot-screens/vesamenu.c32
4.2.6、配置 PXE 引导菜单
1、编辑 default 文件内容
sudo vim /var/lib/tftpboot/pxelinux.cfg/default
#使用 vesamenu.c32 菜单样式作为默认菜单外观。
DEFAULT vesamenu.c32
#等待用户选择菜单的超时时间为 20 秒。
TIMEOUT 200
#关闭提示符,不显示任何输入提示。
PROMPT 0
#禁用用户通过按键来退出菜单。
NOESCAPE 1

#定义一个菜单项,名称为 "Install Ubuntu 18.04 Desktop
LABEL Install Ubuntu 18.04 Desktop
    #在菜单界面显示的文本。
    MENU LABEL Install Ubuntu 18.04 Desktop
    #指定内核文件的路径,根目录为 tftp 根目录
    kernel ubuntu-18.04/casper/vmlinuz
    #指定内核启动参数。这些参数包括 boot=casper(指定启动方式)、automatic-ubiquity(自动执行安装程序)、netboot=nfs(使用NFS作为网络引导方式)、nfsroot=192.168.42.131:/var/lib/tftpboot/ubuntu-18.04/(指定NFS根目录)、initrd=ubuntu/casper/initrd(指定初始化 RAM 磁盘映像的路径)、以及其他一些网络设置和安装选项。
    append boot=casper automatic-ubiquity netboot=nfs nfsroot=192.168.42.131:/var/lib/tftpboot/ubuntu-18.04/ initrd=ubuntu-18.04/casper/initrd url=http://192.168.42.131/preseed.seed auto=true priority=critical ip=dhcp interface=auto netcfg/no_default_route=true quiet splash net.ifnames=0 biosdevname=0 systemd.mask=tmp.mount

#结束标记
ENDTEXT
4.2.7、添加镜像和 preseed
1、下载 ubuntu 镜像,拷贝至 /root 目录下,将镜像挂在 /mnt 下
sudo su -
mount ubuntu-18.04.6-desktop-amd64.iso /mnt/
2、将 ubuntu 安装镜像文件复制到 tftp 根目录下
mkdir /var/lib/tftpboot/ubuntu-18.04
cp -r /mnt/* /var/lib/tftpboot/ubuntu-18.04/
cp -r /mnt/.disk/ /var/lib/tftpboot/ubuntu-18.04/
ls /var/lib/tftpboot/ubuntu-18.04/ -a
3、此时我们通过在客户端进行 pxe 引导,手动安装系统,也可以通过 url 加载 preseed.seed 文件自动化安装,这里选择自动化安装
rm -f /var/www/html/index.html
vim /var/www/html/preseed.seed
# 设置语言、国家、键盘布局
#debian-installer/locale string en_US # 安装程序使用的区域设置,设置为美国英语。
d-i debian-installer/language string en # 语言为英文
d-i debian-installer/country string US # 安装程序的国家为美国
d-i console-setup/ask_detect boolean false # 禁用控制台自动检测,不询问是否自动配置
d-i keyboard-configuration/layoutcode string us # 设置键盘为美国英文布局
d-i keyboard-configuration/xkb-keymap select us # 设置类Unix系统键盘布局为美国
# 设置用户和密码
d-i passwd/user-fullname string gre # 用户全名为 gre
d-i passwd/username string gre # 用户名为 gre
d-i passwd/user-password password gre # 用户密码为 gre
d-i passwd/user-password-again password gre # 确认密码为 gre
d-i passwd/make-user boolean false # 不自动创建用户(上面用户不创建,有问题,实际创建了)
# 设置网络
d-i netcfg/choose_interface select auto # 自动选择合适的网络接口
d-i netcfg/dhcp_timeout string 45 # 设置DHCP超时时间为45秒,超时将停止等待
# 设置时区和时间同步
d-i clock-setup/utc boolean true # 设置系统时钟为 UTC
d-i time/zone string Asia/Shanghai # 设置时区为 上海(Asia/Shanghai)
d-i clock-setup/ntp-server string ntp.ubuntu.com # 设置 NTP服务器为 ntp.ubuntu.com
d-i clock-setup/ntp boolean true # 启用 NTP 时间同步,以自动同步系统时间
# 设置磁盘分区
d-i partman-auto/disk string /dev/sda # 设置分区目标磁盘为/dev/sda,即选择第一个硬盘进行分区
#d-i partman-auto/choose_recipe select atomic # 使用 atomic 分区方案。该方案会使用一个大的单一分区覆盖整个磁盘
d-i partman-auto/choose_recipe select boot-root # boot-root会为/boot和/创建单独的分区
d-i partman-auto/method string regular # 使用常规的分区方法进行磁盘分区
d-i partman-lvm/device_remove_lvm boolean true # 禁用任何 LVM(逻辑卷管理)设备
d-i partman-md/device_remove_md boolean true # 禁用任何软件 RAID(md)设备
d-i partman-partitioning/confirm_write_new_label boolean true # 在安装前确认写入新的分区表
d-i partman/choose_partition select finish # 完成分区选择并开始安装
d-i partman/confirm boolean true # 确认执行分区操作
d-i partman/confirm_nooverwrite boolean true # 确认没有覆盖现有数据的风险
d-i partman/default_filesystem string ext4 # 设置默认文件系统为 ext4
d-i partman/mount_style select uuid # 使用 UUID(通用唯一标识符)来挂载分区,而不是传统的设备名称(如 /dev/sda1)
# 安装软件包
tasksel tasksel/first multiselect ubuntu-desktop # 安装 Ubuntu 桌面环境
#tasksel tasksel/first multiselect minimal # 最小化安装系统
d-i pkgsel/include string ssh vim openssh-server build-essential # 安装过程中包括这些软件包
# 自动升级和更新设置
d-i pkgsel/upgrade select none # 禁用自动升级功能
d-i pkgsel/update-policy select none # 禁用软件包更新策略,即不会自动安装更新
# 完成安装后自动重启
d-i finish-install/reboot_in_progress boolean true配置文件语法解释:
d-i:代表 Debian 安装程序的配置项(例如:d-i passwd/user-fullname),其中d-i是指安装程序。string:表示字符串类型的配置项。boolean:表示布尔类型的配置项,true或false。select:表示选择类型的配置项(通常是一个列表选项)。
1、d-i 代表 Debian Installer 的配置项
-
d-i是 Debian Installer 的一个前缀,用于标识这是一个与安装过程相关的配置项。每个d-i后面的部分是安装过程中的不同模块或者阶段。例如:
d-i debian-installer/language:用于设置安装过程中选择的语言,debian-installer是安装程序的一个模块(或者说阶段),language是它的一个配置项,用来指定所选择的语言。d-i passwd/user-fullname:这个配置项用于设置用户的全名(如用户创建时会用到的名称),passwd是另一个模块,它用于处理与用户相关的设置(例如用户名、密码等)。
2、模块和配置项的结构
配置项的结构是分模块的,主要的模块有:
debian-installer:这个模块处理与安装过程本身相关的设置(如语言、地区、网络设置等)。passwd:这个模块处理与用户管理相关的设置(如用户名、密码、用户全名等)。partman:处理磁盘分区相关的设置。pkgsel:处理软件包选择的配置。clock-setup:处理时钟设置的配置。
3、模块与配置项命名规则
- 模块名称:表示一个功能区域或安装步骤(如
passwd,debian-installer,partman,pkgsel等)。 - 配置项名称:每个模块下有不同的配置项(如
passwd/user-fullname,debian-installer/language,partman-auto/disk等)。
所以,不同模块的配置项是有不同的命名空间的,不同的模块使用不同的前缀,目的是确保配置项在整个安装过程中能够明确标识属于哪个模块,并且避免命名冲突。
为什么 tasksel 没有 d-i 前缀?
tasksel 是一个特殊的配置工具,它在安装过程中负责选择并安装一组预定义的任务(如 ubuntu-desktop, standard 等)。这些任务通常涉及一些大型的软件包集合,比如安装桌面环境、开发工具等。
tasksel 配置项的命名规则:
tasksel直接定义了任务选择,而不需要使用d-i前缀。- 例如:
tasksel/first:这个配置项是告诉安装程序选择哪些任务来作为首次安装时的基本任务集合。tasksel/first multiselect ubuntu-desktop:表示在首次安装时,选择安装ubuntu-desktop任务(即桌面环境)。
这个配置项不需要 d-i 前缀,是因为它在安装过程的 tasksel 步骤中处理,tasksel 自己处理它的任务选择,不需要借助 d-i 来标识。
4.2.8、Cloud-init 自动化
Ubuntu 20.04 开始使用 Subiquity 完成操作系统及附加程序的自动安装,可以通过 cloud-init 提供应答配置,下面我们使用 subiquity + cloud-init + pxe 实现 Ubuntu 自动化安装。
前面通过 DHCP + TFTP 实现 pxe 的引导和加载配置,这里我们使用轻量级的 dnsmasq 服务也可以实现相同的功能。
4.2.8.1、配置 dnsmasq 服务
1、创建存放为客户端提供 tftp 服务所需要的文件的目录 /srv/tftp:
mkdir /srv/tftp2、安装 dnsmasq 包,执行命令:
apt install dnsmasq3、设置文件 /etc/dnsmasq.conf.d/pxe.conf,其内容:
# 设置 DHCP 服务监听的接口 (指定哪些网络接口用来提供 DHCP 服务)
interface=ens32

# 配置 DHCP 地址池范围 (分配的 IP 地址范围为 192.168.22.100 到 192.168.22.200,租期为 12 小时)
dhcp-range=ens32,192.168.42.17,192.168.42.27,12h

# 启用 TFTP 服务 (使 TFTP 功能可用)
enable-tftp

# 设置 TFTP 根目录 (TFTP 文件存放目录,如启动文件等)
tftp-root=/srv/tftp

# 配置 Legacy BIOS 启动文件 (pxelinux.0 是 Legacy BIOS 启动文件)
dhcp-match=set:legacy,option:client-arch,0
dhcp-boot=tag:legacy,pxelinux.0

# 为 UEFI 64 位系统指定启动文件 (bootx64.efi 是 UEFI 64 位启动文件)
dhcp-match=set:efi-x86_64,option:client-arch,7
dhcp-boot=tag:efi-x86_64,bootx64.efi

# 为特定 MAC 地址的主机分配静态 IP 地址 (将特定 MAC 地址的主机与固定 IP 地址绑定)
#dhcp-host=08:00:20:0A:0C:01,Client1,192.168.22.10
#dhcp-host=08:00:20:0A:0C:02,Client2,192.168.22.11

# 设置网关地址 (DHCP 选项 3,指定客户端的默认网关)
dhcp-option=3,192.168.42.2

# 设置 DNS 服务器地址 (DHCP 选项 6,指定客户端使用的 DNS 服务器)
dhcp-option=6,223.5.5.5,8.8.8.8,8.8.4.4

# 设置 PXE 客户端的文件服务器地址 (DHCP 选项 66,告诉客户端文件服务器的地址)
dhcp-option=66,192.168.42.133

# 设置 TFTP 文件根目录 (DHCP 选项 150,告诉客户端 TFTP 文件根目录的位置)
dhcp-option=150,192.168.42.133
注意:上面 ens32 为对客户端安装服务时使用的网卡名(与客户端启动网络安装服务的网卡在同一网络)。
4、重启 dnsmasq 服务,执行命令:
systemctl restart dnsmasq4.2.8.2、准备 PXE 启动文件
1、下载并解压缩 PXE 引导程序及内核映像文件 Netboot
https://wiki.ubuntuusers.de/Downloads/Netzwerkinstallation/
http://cdimage.ubuntu.com/netboot/bionic/
wget http://archive.ubuntu.com/ubuntu/dists/bionic-updates/main/installer-amd64/current/images/netboot/netboot.tar.gz虽然是 ubuntu 18.04 bionic 版本的 netboot 文件,但在 ubuntu 22.04 上也能用,主要用来支持 Legacy Bios 引导。
2、解压缩下载 netboot 文件
tar xf netboot.tar.gz -C /srv/tftp/3、进入 tftp 默认根目录 /srv/tftp/ 查看 netboot 解压后的目录结构,确保 tftp 根目录有 ldlinux.c32、libcom32.c32、libutil.c32、vesamenu.c32 这 4 个文件,这些文件都在 /srv/tftp/ubuntu-installer/amd64/boot-screens 目录中,可以软连接到根目录。
sudo ln -sv ubuntu-installer/amd64/boot-screens/vesamenu.c32 vesamenu.c32
sudo ln -sv ubuntu-installer/amd64/boot-screens/libcom32.c32 libcom32.c32
sudo ln -sv ubuntu-installer/amd64/boot-screens/libutil.c32 libutil.c32
4、确保 pxelinux.0 和 pxelinux.cfg/default 文件在 tftp 根目录 /srv/tftp/ 中,当然我这里解压 netboot 后自动创建了这两个文件的软连接。
ls -l /srv/tftp/
total 8
lrwxrwxrwx 1 root root   47  9月 15  2021 ldlinux.c32 -> ubuntu-installer/amd64/boot-screens/ldlinux.c32
lrwxrwxrwx 1 root root   48  2月 23 21:50 libcom32.c32 -> ubuntu-installer/amd64/boot-screens/libcom32.c32
lrwxrwxrwx 1 root root   47  2月 23 21:50 libutil.c32 -> ubuntu-installer/amd64/boot-screens/libutil.c32
lrwxrwxrwx 1 root root   33  9月 15  2021 pxelinux.0 -> ubuntu-installer/amd64/pxelinux.0
lrwxrwxrwx 1 root root   35  9月 15  2021 pxelinux.cfg -> ubuntu-installer/amd64/pxelinux.cfg
drwxrwxr-x 3 root root 4096  9月 15  2021 ubuntu-installer
-rw-rw-r-- 1 root root   61  9月 15  2021 version.info
lrwxrwxrwx 1 root root   48  2月 23 21:50 vesamenu.c32 -> ubuntu-installer/amd64/boot-screens/vesamenu.c32
4.2.8.4、安装 WEB 服务
安装时,需要通过 HTTP 协议下载所需文件,为此需要配置 WEB 服务。
1、安装所需要包,并重新启动服务:
apt install apache2
systemctl restart apache2
4.2.8.5、准备 Ubuntu 22.04 源
1、针对该次使用 Ubuntu 22.04 server 版(代号: jammy),建议有些配置文件放置在目录 /var/www/html/jammy 下,为此先生成该目录:
mkdir /var/www/html/jammy2、下载所需要的操作系统 Live ISO 镜像到目录 /var/www/html:
cd /var/www/html/jammy
wget http://mirrors.ustc.edu.cn/ubuntu-releases/jammy/ubuntu-22.04.1-live-server-amd64.iso
3、挂载该 ISO 文件:
mount -o loop /var/www/html/jammy/ubuntu-22.04.1-live-server-amd64.iso /mnt4、将内核和 initrd 从其中复制到 dnsmasq 中设置的 tftp 的位置:
cp /mnt/casper/{vmlinuz,initrd} /srv/tftp/4.2.8.6、为 UEFI 引导设置文件
1、将签名的 shim 二进制文件复制到位:
apt download shim-signed
dpkg-deb --fsys-tarfile shim-signed*deb | tar x ./usr/lib/shim/shimx64.efi.signed -O > /srv/tftp/bootx64.efi
注意,如果这一步有问题,说文件不存在,那要查看一下这个 deb 包里面的文件名称,有可能名称有点区别,我这里就有问题,通过下面方法解决。
dpkg-deb -c shim-signed_*.deb
dpkg-deb --fsys-tarfile shim-signed*deb | tar x ./usr/lib/shim/shimx64.efi.signed.latest -O > /srv/tftp/bootx64.efi
2、将签名的 grub 二进制文件复制到位:
apt download grub-efi-amd64-signed
dpkg-deb --fsys-tarfile grub-efi-amd64-signed*deb | tar x ./usr/lib/grub/x86_64-efi-signed/grubnetx64.efi.signed -O > /srv/tftp/grubx64.efi
3、Grub 还需要在 tftp 上可用的字体:
apt download grub-common
dpkg-deb --fsys-tarfile grub-common*deb | tar x ./usr/share/grub/unicode.pf2 -O > /srv/tftp/unicode.pf2
4、生成文件 /srv/tftp/grub/grub.cfg,内容为:
set default="0"
set timeout=0

if loadfont unicode ; then
  set gfxmode=auto
  set locale_dir=$prefix/locale
  set lang=en_US
fi
terminal_output gfxterm

set menu_color_normal=white/black
set menu_color_highlight=black/light-gray
if background_color 44,0,30; then
  clear
fi

function gfxmode {
        set gfxpayload="${1}"
        if [ "${1}" = "keep" ]; then
                set vt_handoff=vt.handoff=7
        else
                set vt_handoff=
        fi
}

set linux_gfx_mode=keep

export linux_gfx_mode

menuentry 'Ubuntu 22.04.1' {
        gfxmode $linux_gfx_mode
        linux /vmlinuz $vt_handoff ip=dhcp url=http://192.168.42.133/jammy/ubuntu-22.04.1-live-server-amd64.iso autoinstall ds=nocloud-net\;s=http://192.168.42.133/jammy/ ---
        #注意上面最后面有三个-
        initrd /initrd
}
备注
- linux /vmlinuz 行的
ds=nocloud-net\;s=http部分的;前面有个转义符\,最后有三个-。- 上述配置非常简单。PXELINUX 有很多选项,可以在 https://wiki.syslinux.org/wiki/index.php?title=PXELINUX 查阅其文档以获取更多信息。
4.2.8.7、cloud-init 配置
自动安装配置的完整说明参见:https://ubuntu.com/server/docs/install/autoinstall-reference
cloud-init 使用以下三种数据并对其进行操作。
- 用户数据 user-data :包含执行无人值守自动安装所需的指令,如要安装的软件包、分区布局、网络配置等。
- 元数据 meta-data :包括与特定数据源关联的数据,如可以包括服务器名称和实例ID等。
- 供应商数据 vendor-data :由组织(如,云提供商)提供的,包括可以自定义镜像以更好地适应镜像运行环境的信息,该种数据为可选。
1、设置用户数据文件 /var/www/html/jammy/user-data(可以采用文件 /var/log/installer/autoinstall-user-data 为模板修改),其内容为:
#cloud-config
autoinstall:
  version: 1
  late-commands:
    - mkdir /target/root/.ssh && echo "ssh-rsa AAAAB3NzaC1yc2EAAAADAQABAAABgQDZUS2FXGm2yK09Tv0biWIwLszp0TPGzB2u1PD/QXCGPimLOmEP2xAFJbgwzeXlgfnj01LP7BD65lidSPd68WwaUsNHdlikfwf9iRdlSXxNg+PVueY2KPHRzgQ5omtAzJFUUnHKIOSH/Ozo9tmwrs4tZc4CNpx44InvgQY3yeKfhqvVn2O+WazirNlGsFRcpMcjLJjZ+U2OfMGM4l0soSDJKJTKoaHmV0XpIOA2iqfQmOgFDZExqmjc8Vj/1hTBvTzyhgMPlzkDz28UsuBT3U+RZiZJokPtXks5mnVkVYzQvOkln3r0+bmOX0Q4qDg2HhinSpGXAZGln1PKH3AFU7StMIg6e1Lb8AMNHNxWBR61uXIwJJw3dcP6Sy3N4Gq3WW+hkVsHJgZRD+dPQNRwMHIY1CIfBtB9TySKpwNwSAeXiBPFoYgAi0RlbrdHLpjDl9LxK/vyZ1gvGSumtU9IM01EZWfXfCKoMX68ljIaVsHHhHbqIXSS7AjaEsJO+ss8nQU= root@ubuntu22-server.hanhai22.ustc.edu.cn" >/target/root/.ssh/authorized_keys
  # 修改apt 服务地址
  apt:
    primary:
    - arches: [default]
      uri: https://mirrors.tuna.tsinghua.edu.cn/ubuntu
  user-data:
    # 配置时区
    timezone: Asia/Shanghai
    # 去使能 root账号
    disable_root: true
  # 配置用户
  identity:
    hostname: ubuntu-server
    password: "$6$saltsalt$1exCt/dOPxcYhFKNrpFEJZM3XdbauNE1U6SSfdUbaG/VkuiiZ9y002RSRJzuNQ03V0IN9WSP0CpiOXuoSRVIU0"
    username: ubuntu
  # 配置键盘
  keyboard: {layout: us, variant: ''}
  locale: en_US.UTF-8
  # 配置代理
  #proxy: http://192.168.1.112:3128
  # 默认安装ssh server
  ssh:
    install-server: true
  # 指定安装的包
  packages:
    - net-tools
    - python3-pip
  # 配置磁盘分区
  storage:
    grub:
      reorder_uefi: False
    config:
    - {ptable: gpt, path: /dev/sda, wipe: superblock-recursive, preserve: false, name: '',
      grub_device: false, type: disk, id: disk-sda}
    - {device: disk-sda, size: 536870912, wipe: superblock, flag: boot, number: 1,
      preserve: false, grub_device: true, type: partition, id: partition-0}
    - {fstype: fat32, volume: partition-0, preserve: false, type: format, id: format-0}
    - {device: disk-sda, size: -1, wipe: superblock, flag: '', number: 2,
      preserve: false, type: partition, id: partition-1}
    - {fstype: ext4, volume: partition-1, preserve: false, type: format, id: format-1}
    - {device: format-1, path: /, type: mount, id: mount-1}
    - {device: format-0, path: /boot/efi, type: mount, id: mount-0}
备注:late-commands 等中的字符串在传递给执行安装的主机时,有些特殊字符串需要特殊处理。
2、生成所需要的文件 meta-data (空文件即可),执行命令:
touch /var/www/html/jammy/meta-data3、供应商数据文件 vendor-data 非必需,可不管。
4、确保目录 /var/www/html/jammy/ 下的文件对所有人可读:
chmod -R a+r /var/www/html/jammy/备注:做好上述工作后,同一子网内的客户机启动采用 PXE 引导时,即可自动安装配置所需要的系统。
4.2.8.8、兼容 Legacy Bios
编辑 /srv/tftp/pxelinux.cfg/default 文件,内容如下:
default jammy
timeout 0
prompt 0

label jammy
        menu label Install Ubuntu J^ammy (22.04)
        kernel /vmlinuz ip=dhcp url=http://192.168.42.133/jammy/ubuntu-22.04.1-live-server-amd64.iso autoinstall ds=nocloud-net;s=http://192.168.42.133/jammy/ ---
initrd /initrdip=dhcp:告诉内核使用 DHCP 获取 IP 地址。url=http://192.168.42.133/jammy/ubuntu-22.04.1-live-server-amd64.iso:指定安装介质的 URL,CentOS PXE 使用inst.repo=进行 ISO 加载。autoinstall:启用 Ubuntu 的自动化安装模式,自动化必选项。ds=nocloud-net;s=http://192.168.42.133/jammy/:ds=nocloud-net告诉cloud-init使用 NoCloud 数据源,s=http://192.168.42.133/jammy/指定了user-data和meta-data的位置。- 转义问题:在 UEFI 环境下,分号(
;)在 GRUB 命令行中有特殊含义,因此需要转义(\;)以避免被解释为命令分隔符。在传统 BIOS 环境下,分号没有特殊含义,因此不需要转义。
注意:这里特别要强调一下,grub 配置中 linux /vmlinuz 行的
ds=nocloud-net\;s=http部分的;前面有个转义符\,这是因为 grub 会把;识别为分隔符,但ds=nocloud-net\;s=http是个整体,所以需要转义,但是 Legacy Bios 不能转义,转义反而报错。科普:
autoinstall url=http://<server>/ubuntu.iso ds=nocloud-net;s=http://192.168.42.133/jammy/这些内核参数是 ubuntu 发行版独有的参数,专门用来自动化安装和配置。对比前面的 centos pxe,内核参数是不一样的。ubuntu cloud-init pxe 需要借助
cloud-init服务加载user-data配置文件,来完成后面的自动化安装,所以在 ubuntu 发行版cloud-init服务被嵌入到initramfs中,PXE 引导早期阶段内核加载initramfs过程中,就会启动cloud-init服务,以便加载user-data配置。兼容问题:
如果前面配置都没有问题,客户端还是不能引导,或者一会可以一会又不行,实践中发现有一个兼容问题,就是
user-data加载不出来,需要给内核再传递一个参数cloud-config-url=/dev/null或cloud-config-url=http://192.168.42.133/jammy/user-data,如下:Ubuntu 20.04:在 20.04 中,
cloud-config-url=/dev/null用于禁用cloud-init的默认配置源,避免它从其他地方加载配置。这是因为 20.04 的cloud-init可能会尝试从默认的云数据源(如AWS、Azure等)获取配置,而/dev/null可以确保它不会加载外部默认配置。Ubuntu 22.04:在 22.04 中,
cloud-init的行为有所改变,autoinstall机制更加成熟,因此可以直接通过cloud-config-url指定user-data的位置。user-data文件包含了自动化安装的配置。
编辑 /var/www/html/jammy/user-data 文件,内容如下:
#cloud-config
autoinstall:
  version: 1
  # 修改apt 服务地址
  apt:
    primary:
    - arches: [default]
      uri: https://mirrors.tuna.tsinghua.edu.cn/ubuntu
  user-data:
    # 配置时区
    timezone: Asia/Shanghai
    # 去使能 root账号
    disable_root: true
  # 配置用户
  identity:
    hostname: ubuntu-server
    password: "$6$saltsalt$1exCt/dOPxcYhFKNrpFEJZM3XdbauNE1U6SSfdUbaG/VkuiiZ9y002RSRJzuNQ03V0IN9WSP0CpiOXuoSRVIU0"
    username: ubuntu
  # 配置键盘
  keyboard: {layout: us, variant: ''}
  locale: en_US.UTF-8
  # 配置代理
  #proxy: http://192.168.1.112:3128
  # 默认安装ssh server
  ssh:
    install-server: true
  # 指定安装的包
  packages:
    - net-tools
    - python3-pip
  # 配置磁盘分区
  storage:
    grub:
      reorder_uefi: False
    config:
    # Install GRUB in MBR,这里是gpt类型,使用dos类型也可以
    - { ptable: gpt, path: /dev/sda, wipe: superblock, preserve: false, name: '', grub_device: true, type: disk, id: disk-sda }
    # BIOS boot partition 这个分区很重要,这里面要放grub stage_1.5 stage2 或者 grub2 core.img,gpt对应flag bios_grub,dos对应flag active
    - { device: disk-sda, size: 1048576, flag: bios_grub, number: 1, preserve: false, grub_device: false, type: partition, id: partition-0 }
    # boot分区,格式化ext4
    - { device: disk-sda, size: 1073741824, wipe: superblock, flag: '', number: 2, preserve: false, grub_device: false, type: partition, id: partition-1 }
    - { fstype: ext4, volume: partition-1, preserve: false, type: format, id: format-1 }
    # 根分区,格式化ext4
    - {device: disk-sda, size: -1, wipe: superblock, flag: '', number: 3, preserve: false, type: partition, id: partition-2}
    - {fstype: ext4, volume: partition-2, preserve: false, type: format, id: format-2}
    # 挂载根分区和boot分区
    - { path: /, device: format-2, type: mount, id: mount-2 }
    - { path: /boot, device: format-1, type: mount, id: mount-1 }
整体思路参考:https://scc.ustc.edu.cn/hmli/doc/linux/ubuntu-autoinstall/index.html
分区模板参考:https://www.molnar-peter.hu/en/ubuntu-jammy-netinstall-pxe.html
4.3、Cobbler
我们这里实验环境是操作系统 CentOS 7.x,Cobbler 2.x,在生产上也用了很多年。从 CentOS 8 开始,Cobbler 3.x,几乎从来没有一次性部署成功过,既便你照着官方文档操作,也很难一次性成功,要手动解决很多 bug,才可能部署成功,所以个人意见是 Cobbler 3.x 不用也罢。
官网源码:https://github.com/cobbler/cobbler
官网文档:https://cobbler.readthedocs.io/en/latest/
Cobbler 实质上是 PXE 的二次封装,将多种安装参数封装到一起,并提供统一的管理方法。
Cobbler 安装系统需要一台专门提供各种服务的服务器,提供的服务包括(HTTP/FTP/NFS/TFTP/DHCP),也可以将这几个服务分别部署到不同服务器。
4.3.1、Cobbler 的工作原理
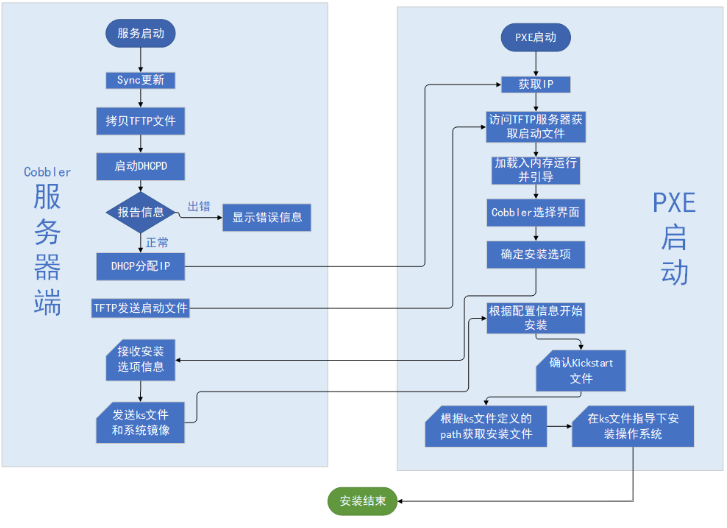
- Client 裸机配置了从网络启动后,开机后会广播请求 DHCP 服务器(Cobbler Server)发送一个 IP;
- DHCP 服务器(Cobbler Server)收到请求后作出响应,包含 IP 地址;
- Client 裸机拿到 IP 后再向 Cobbler Server 请求 OS 引导文件;
- Cobbler Server 告诉裸机 OS 引导文件的名字和 TFTP Server 的 IP 和 Port;
- Client 裸机通过 TFTP Server 地址下载引导文件;
- Client 裸机执行该引导文件,确认加载信息,选择要安装的 OS,然后再向 Cobbler Server 请求 Kickstart 文件和 OS Image;
- Cobbler Server 发送 Kickstart 和 OS Image;
- Client 裸机加载 Kickstart 文件;
- Client 裸机接收 OS Image,安装该 OS Image。
4.3.2、安装 Cobbler 及依赖服务
Cobbler 所依赖的服务包括 HTTPD,TFTP,DHCP 等,如果有 web 界面要求,还需要安装相关的组件。
yum install epel-release -y
yum install dhcp cobbler cobbler-web pykickstart httpd tftp-server -y
启动服务
systemctl enable --now cobblerd httpd tftp- dhcpd 需要配置后才能启动。
配置文件
/etc/cobbler/settings           #cobbler 主配置文件
/etc/cobbler/iso/               #iso模板配置文件
/etc/cobbler/pxe                #pxe模板文件
/etc/cobbler/power              #电源配置文件
/etc/cobbler/user.conf          #web服务授权配置文件
/etc/cobbler/users.digest       #web访问的用户名密码配置文件
/etc/cobbler/dhcp.template      #dhcp服务器的的配置模板
/etc/cobbler/dnsmasq.template   #dns服务器的配置模板
/etc/cobbler/tftpd.template     #tftp服务的配置模板
/etc/cobbler/modules.conf       #cobbler模块的配置文件
数据目录
/var/lib/cobbler/config/        #用于存放distros,system,profiles 等信息的配置文件
/var/lib/cobbler/triggers/      #用于存放用户定义的cobbler命令
/var/lib/cobbler/kickstarts/    #默认存放kickstart文件
/var/lib/cobbler/loaders/       #存放各种引导程序
镜像目录
/var/www/cobbler/ks_mirror/     #导入的发行版系统的所有数据
/var/www/cobbler/images/        #导入发行版kernel和initrd镜像用于远程网络启动
/var/www/cobbler/repo_mirror/   #yum 仓库存储目录
日志目录
/var/log/cobbler/installing     #客户端安装日志
/var/log/cobbler/cobbler.log    #cobbler日志
4.3.2.1、Cobbler 检查
启动服务后,开始进行相应检查。如下:
cobbler check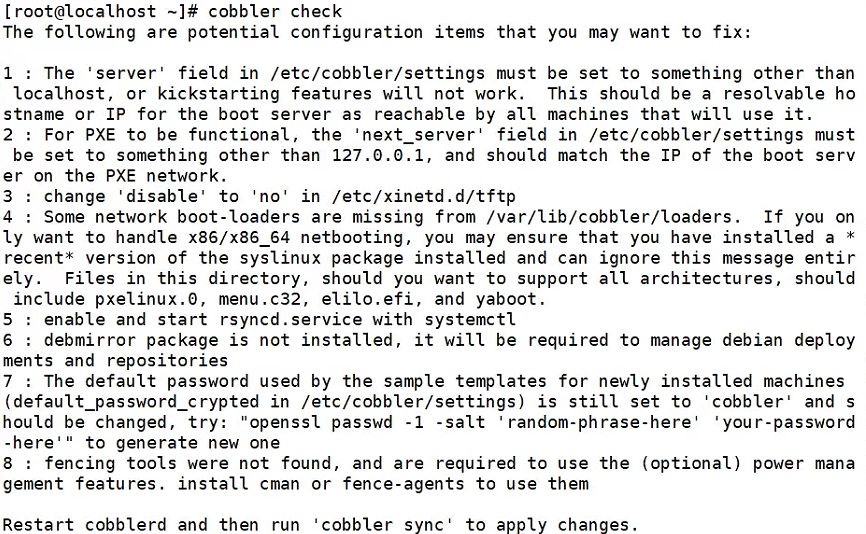
依次解决上面的错误:
问题 1, 2:
修改配置文件 /etc/cobbler/settings
server: 192.168.1.x         #修改为cobbler server端所在机器IP
next_server: 192.168.1.x    #修改为cobbler server端所在机器IP
问题 3:
开启 tftp 服务
vi /etc/xinetd.d/tftp # ==> disable = no
systemctl restart tftp
systemctl enable tftp
问题 4:
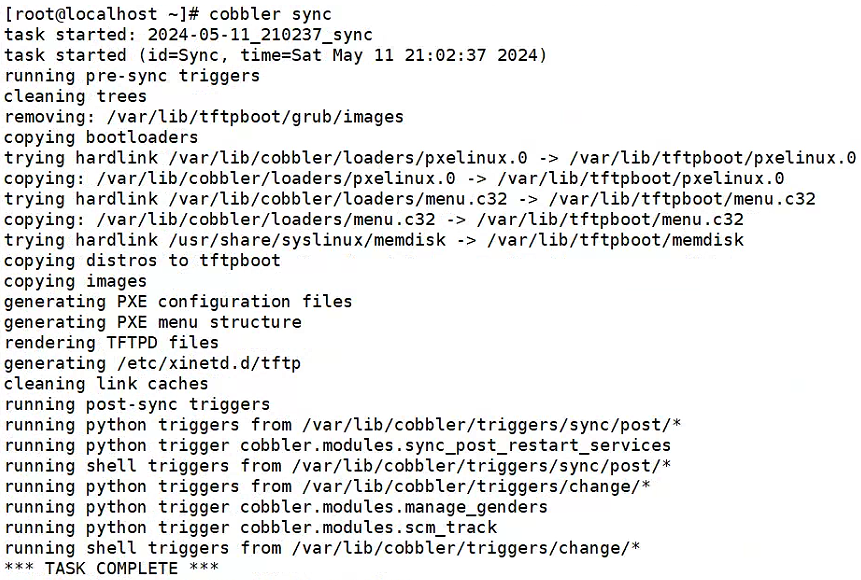
根据提示,安装 syslinux 后,重启 cobbler 服务并执行 cobbler sync /var/lib/cobbler/loaders 中会出现引导文件的软链接,并且会 sync 到 /var/lib/tftpboot 当中用以 pxe 引导。
也可以手动拷贝下面两个重要文件到 /var/lib/cobbler/loaders,然后 cobbler sync,同步到 /var/lib/tftpboot 下。
cp -a /usr/share/syslinux/{pxelinux.0,menu.c32} /var/lib/cobbler/loaders问题 5:
开启 rsync 服务
systemctl start  rsyncd
systemctl enable rsyncd
问题 6:
安装 debmirror
yum install debmirror -y问题 7:
修改配置文件 /etc/cobbler/settings
default_password_crypted: "$1$root$j0bp.KLPyr.u9kgQ428D10"上面的加密密码使用下面的命令生成:
openssl passwd -1 -salt "test" "123456" #"test"可以为任意字符串, "123456"为密码问题 8:
安装 fence-agents
yum install fence-agents -y按照以上步骤修复完问题之后,重启 cobbler 服务,再次 check,如下:
systemctl restart cobblerd
cobbler check
则会收到如下报告:
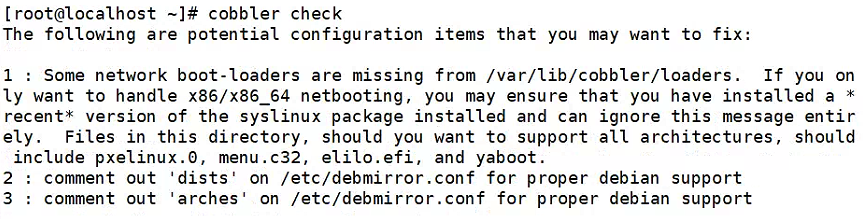
问题 1 是因为 syslinux 没有 elilo.efi 和 yaboot 文件,可以忽略。
解决问题 2, 3:编辑 /etc/debmirror.conf 文件,注释如下两行。
# @dists="sid";
# @arches="i386";
执行以下命令使配置生效:
cobbler sync- cobbler 中配置的模板文件会 sync 到相关的服务配置中去,相当于集中在 cobbler 中配置,统一管理 dhcpd tftp httpd 等服务。
4.3.2.2、Cobbler 配置
在 cobber server 端安装完并且 check 成功之后,接下来需要对 cobbler 做相应的配置,以便后续使用。
修改配置文件 /etc/cobbler/settings,需要关注的配置如下:
manage_dhcp: 1      #启用dhcp管理
pxe_just_once: 1    #仅安装一次
修改配置文件 /etc/cobbler/dhcp.template,需要关注的配置如下:
option routers             192.168.1.x; #修改为cobbler server端所在机器IP
option domain-name-servers 192.168.1.x; #修改为cobbler server端所在机器IP- 注意,subnet 中配置的网段必须要跟 pxe 网卡的网段要一致。
在 cobber 配置更改之后,需要将所有的配置重新生成同步一次(尤其是 DHCP 配置文件),如下:
service cobblerd restart
cobbler sync
service cobblerd restart
由于启用了 DHCP 管理,因此需要运行并设置 DHCP 开机自启,如下:
systemctl start  dhcpd
systemctl enable dhcpd
4.3.3、CentOS 安装配置
1、上传 ISO 镜像
将 Centos7、Centos6、Ubuntu16 镜像一次性拷贝至 cobbler server 服务器 /root/ 目录下,在 /mnt/ 目录下为其建立一个目录并挂载,如下:

2、导入 ISO 镜像
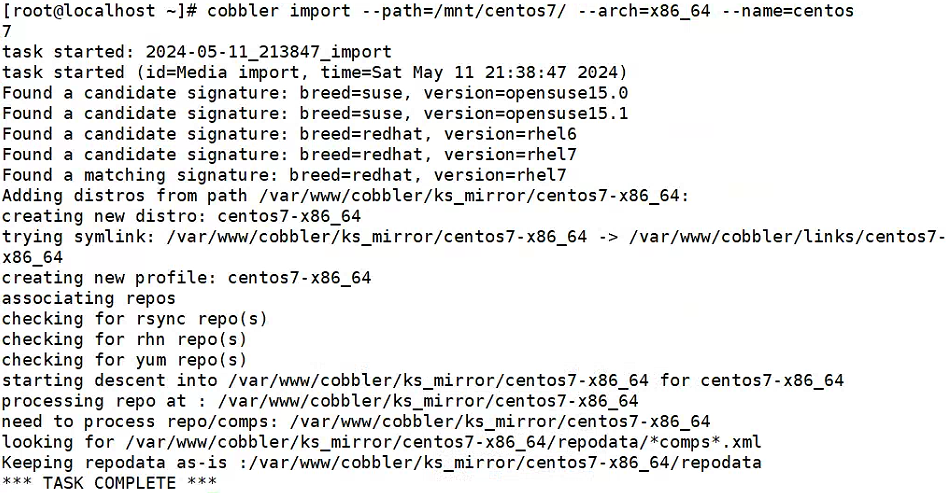
成功挂载后,开始导入至 cobbler 中,如下:
cobbler import --path=/mnt/centos7/ --arch=x86_64 --name=centos7导入成功后,会输出:TASK COMPLETE ,截图如下:
导入镜像的同时,cobbler 会自动生成该镜像的 profile 和 distro,可以通过 list 和 report 命令来查看细节,如下:
cobbler list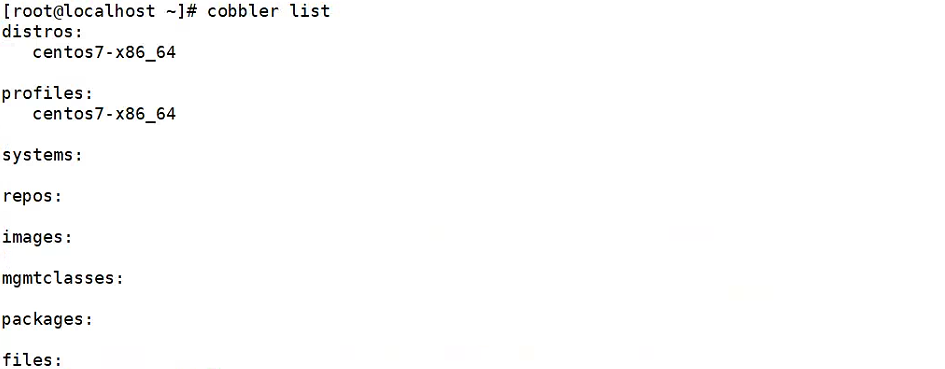
cobbler report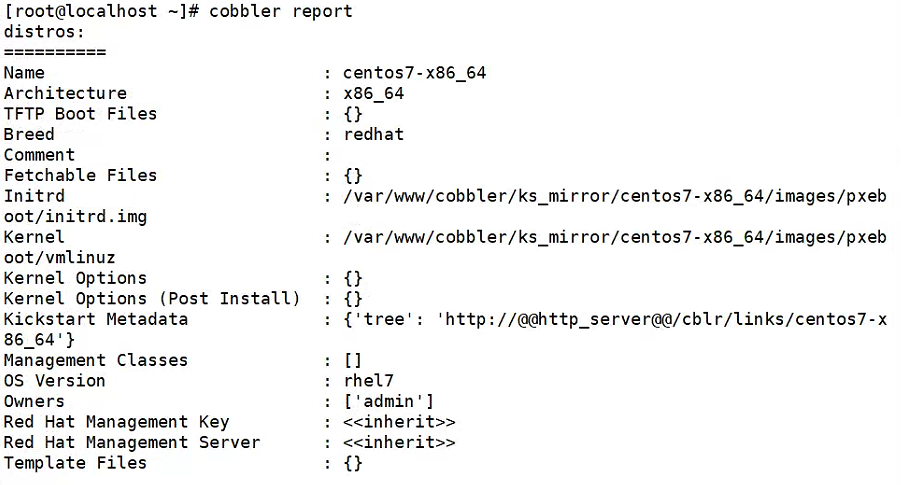
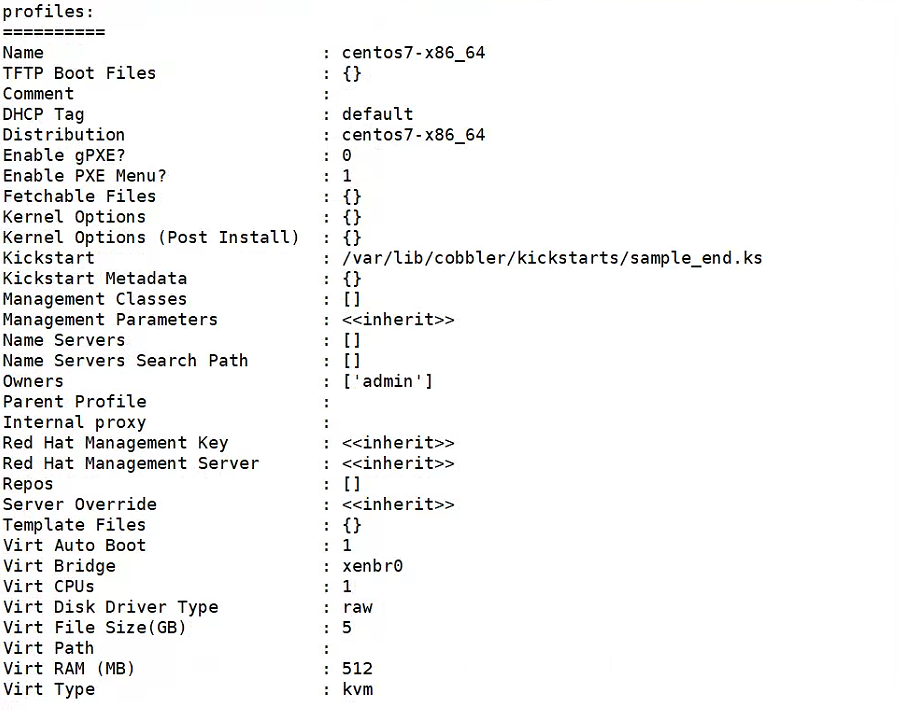
从上图可以看到我们导入的 centos7 使用的 Kickstart 文件是 /var/lib/cobbler/kickstarts/sample_end.ks。
3、配置 ISO 镜像自动值守安装文件
配置 ISO 镜像自动值守安装文件的目的是用来设定 ISO 镜像在安装过程中如何配置(也就是操作系统的那些设置,如硬盘分区、用户帐号、密码等)。
从第二步 cobbler report 中可以看到,导入的系统相关配置文件路径为 /var/lib/cobbler/kickstarts/sample_end.ks,那么我们就可以修改该文件,在该文件中指定操作系统安装的设置(事实上,我们可以在第二步中指定具体的配置,未指定才会使用该默认文件),配置如下。
auth  --useshadow  --enablemd5
bootloader --location=mbr
clearpart --all --initlabel
graphical
firewall --enabled
firstboot --disable
keyboard us
lang en_US
url --url=$tree
$yum_repo_stanza
$SNIPPET('network_config')
reboot

#Root password
rootpw --iscrypted $default_password_crypted
selinux --disabled
skipx
timezone  America/New_York
install
zerombr
autopart

%pre
$SNIPPET('log_ks_pre')
$SNIPPET('kickstart_start')
$SNIPPET('pre_install_network_config')
$SNIPPET('pre_anamon')
%end

%packages
$SNIPPET('func_install_if_enabled')
%end

%post --nochroot
$SNIPPET('log_ks_post_nochroot')
%end

%post
$SNIPPET('log_ks_post')
$yum_config_stanza
$SNIPPET('post_install_kernel_options')
$SNIPPET('post_install_network_config')
$SNIPPET('func_register_if_enabled')
$SNIPPET('download_config_files')
$SNIPPET('koan_environment')
$SNIPPET('redhat_register')
$SNIPPET('cobbler_register')
$SNIPPET('post_anamon')
$SNIPPET('kickstart_done')
%end
$SNIPPET('log_ks_pre') 是 cobbler 特有的,在安装过程中调用 /var/lib/cobbler/snippets/ 目录下的脚本。
4.3.4、Ubuntu 安装配置
1、上传 ISO 镜像
将 ubuntu-16.04.6-server-i386.iso 镜像拷贝至 cobbler server 服务器 /root/ 目录下,在 /mnt/ 目录下为其建立一个目录并挂载,如下:
mkdir /mnt/ubuntu16
mount -t iso9660 -o loop,ro ubuntu-16.04.6-server-i386.iso /mnt/ubuntu16
2、导入 ISO 镜像
成功挂载后,开始导入至 cobbler 中,如下:
cobbler import --name=ubuntu16 --path=/mnt/ubuntu16/ --breed=ubuntu导入成功后,会输出:TASK COMPLETE,截图如下:
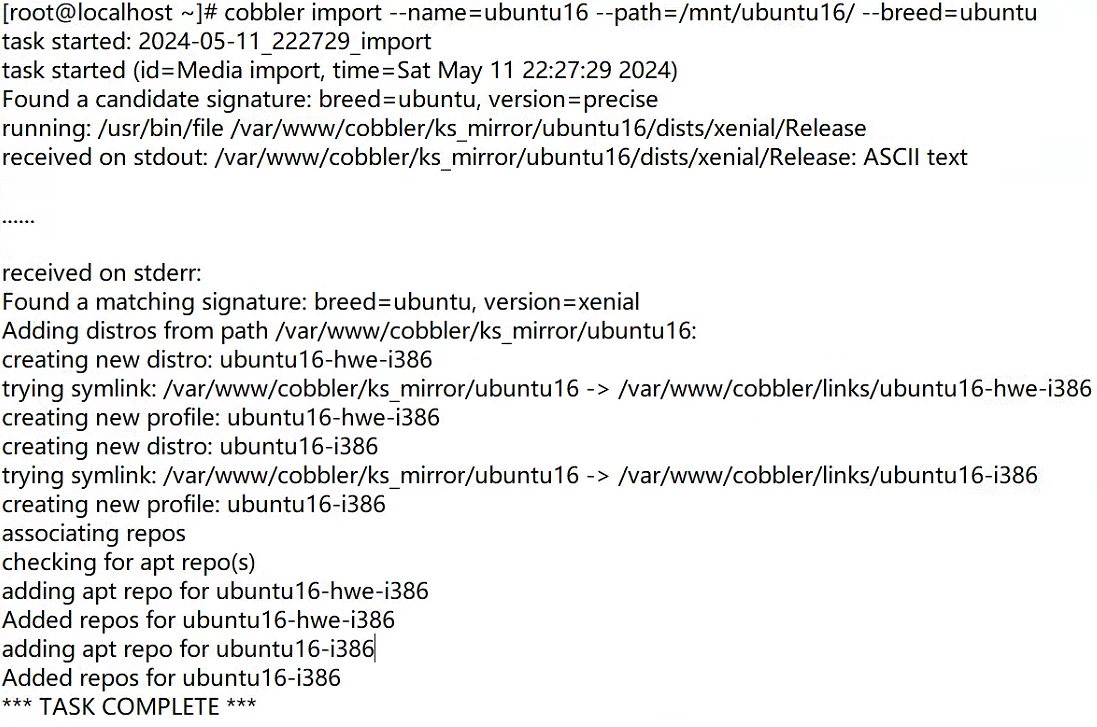
导入镜像的同时,Cobbler 会自动生成该镜像的 profile 和 distro,可以通过 list 和 report 命令来查看细节,如下:
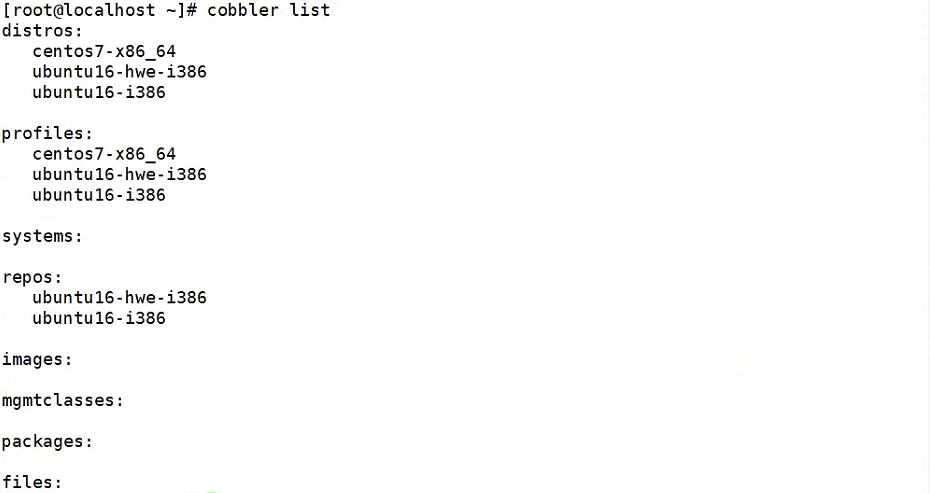
ubuntu16-hwe 是 ubuntu 自带的跟服务器硬件尽可能兼容的内核版本。
cobbler report从报告中可以看到我们导入的 Ubuntu 16.04.6 使用的 preseed 文件是 /var/lib/cobbler/kickstarts/sample.seed。
3、配置 ISO 镜像自动值守安装文件
这里的第三步和 CentOS 系统一样,也是用来设定 ISO 镜像在安装过程中如何配置。
d-i debian-installer/locale string en_US

d-i console-setup/ask_detect boolean false
d-i keyboard-configuration/toggle select No toggling
d-i keyboard-configuration/layoutcode string us
d-i keyboard-configuration/variantcode string

d-i netcfg/choose_interface select auto
d-i netcfg/get_hostname string $myhostname

d-i time/zone string US/Eastern
d-i clock-setup/utc boolean true
d-i clock-setup/ntp boolean true
d-i clock-setup/ntp-server  string ntp.ubuntu.com

d-i mirror/country string manual
d-i mirror/http/hostname string $http_server
d-i mirror/http/directory string $install_source_directory
d-i mirror/http/proxy string

d-i live-installer/net-image string http://$http_server/cobbler/links/$distro_name/install/filesystem.squashfs

d-i partman/choose_partition select finish
d-i partman/confirm boolean true
d-i partman/confirm_nooverwrite boolean true
d-i partman-auto/method string lvm
d-i partman-lvm/device_remove_lvm boolean true
d-i partman-lvm/confirm boolean true
d-i partman-lvm/confirm_nooverwrite boolean true
d-i partman-md/device_remove_md boolean true
d-i partman-partitioning/confirm_write_new_label boolean true

d-i partman-auto/choose_recipe select atomic

d-i passwd/root-login boolean true
d-i passwd/root-password-crypted password $default_password_crypted

d-i passwd/make-user boolean false

$SNIPPET('preseed_apt_repo_config')

tasksel tasksel/first multiselect standard

d-i pkgsel/include string ntp ssh wget

d-i grub-installer/grub2_instead_of_grub_legacy boolean true
d-i grub-installer/bootdev string default

d-i debian-installer/add-kernel-opts string $kernel_options_post

d-i finish-install/reboot_in_progress note

d-i preseed/early_command string wget -O- \
   http://$http_server/cblr/svc/op/script/$what/$name/?script=preseed_early_default | \
   /bin/sh -s

d-i preseed/late_command string wget -O- \
   http://$http_server/cblr/svc/op/script/$what/$name/?script=preseed_late_default | \
   chroot /target /bin/sh -s